Getting Started
Download and Installation
Getting Organized
Creating Enclosing Directory
Create a vivarium_work folder anywhere you like. But for installing
some third-party software, everything we do will occur inside this
folder.
Setting PYTHONPATH
Vivarium Core needs the root of the repository to be in your
PYTHONPATH environment variable so that Python can find Vivarium
Core. To make this easy to set, we suggest adding this line to your
shell startup file:
alias pycd='export PYTHONPATH="$PWD"'
Now when you are about to work on Vivarium Core, navigate to the root of
the Vivarium Core repository (vivarium_work/vivarium-template) and run
pycd in your terminal. You will need to do this for each terminal
window you use.
Installing Dependencies
Below, we list the dependencies Vivarium Core requires, how to check whether you have them, how to install them, and in some cases, how to set them up for Vivarium Core. Make sure you have each of them installed.
Python 3
Vivarium Core requires Python 3.8, 3.9, or 3.10.
Check Installation
$ python --version
Python <version>
Make sure you see a version starting with 3.8, 3.9, or 3.10.
Install
Download the latest installer from the Python download page
MongoDB
We use a MongoDB database to store the data collected from running simulations. This can be a remote server, but for this guide we will run a MongoDB server locally.
Note: MongoDB is only required if you want to store data in MongoDB or want to run experiments that do so. You don’t need MongoDB to work through this guide.
Check Installation
$ mongod --version
db version v4.2.3
...
Make sure you see a version at least 3.2.
Install
If you are on macOS, you can install MongoDB using Homebrew. You will need to add the MongoDB tap following the instructions here.
If you are on Linux, see the MongoDB documentation’s instructions.
Setup
You can get a MongoDB server up and running locally any number of ways. Here is one:
Create a folder
vivarium_work/mongodb. This is where MongoDB will store the database We store the database here instead of at the default location in/usr/local/var/mongodbto avoid permissions issues if you are not running as an administrator.Make a copy of the
mongodconfiguration file so we can make changes:$ cp /usr/local/etc/mongod.conf vivarium_work/mongod.confNote that your configuration file may be somewhere slightly different. Check the MongoDB documentation for your system.
In
vivarium_work/mongod.confchange the path afterdbPath:to point tovivarium_work/mongodb.Create a shell script
vivarium_work/mongo.shwith the following content:#!/bin/bash mongod --config mongod.confMake the script executable:
$ chmod 700 vivarium_work/mongo.sh
Now you can launch MongoDB by running this script:
$ vivarium_work/mongo.sh
Download and Setup Template Project
Download the Code
The template code is available on GitHub. Move into
your vivarium_work directory and clone the repository to download
the code
$ cd vivarium_work
$ git clone https://github.com/vivarium-collective/vivarium-template.git
This will create a vivarium-template folder inside vivarium_work.
All the code for your model will be inside this vivarium-template
folder.
Repository Structure
The repository you downloaded should look like this:
.
├── README.md
├── pytest.ini
├── release.sh
├── requirements.txt
├── setup.py
└── template
    ├── __init__.py
    ├── compartments
    ├── composites
    │   ├── __init__.py
    │   └── injected_glc_phosphorylation.py
    ├── experiments
    │   ├── __init__.py
    │   └── glucose_phosphorylation.py
    ├── library
    │   └── __init__.py
    └── processes
        ├── __init__.py
        ├── glucose_phosphorylation.py
        └── template_process.py
We suggest you use the structure laid out here, but you don’t have to.
The template repository has TODO notes where you’ll need to make
changes. Before you publish your project, make sure you have removed all
the TODO notes!
The template directory is where your package will live. Under it, we
have the following sub-folders:
library: This is for utility functions like those shared across processes, composers, and/or experiments.processes: This is where you’ll write your processes. We’ve provided atemplate_process.pyfile to get you started. Generally you’ll want to have one process per file.composites: This folder will hold your composers, which generate composites of multiple processes.experiments: This folder will hold your experiments. These are the files you’ll probably be executing to run your simulations.
To show how you can build models with Vivarium, we’ve included some examples around modeling glucose phosphorylation.
Installing Python Packages
Above we installed all the non-Python dependencies, but we still have to install the Python packages Vivarium Core uses.
Move into the
vivarium-templatefolder created when you cloned the repository.(optional) Create and activate a virtual environment using
venvorpyenv virtualenv, e.g.:$ python3 -m venv venv --prompt "vivarium-template" ... $ source venv/bin/activate
Install packages
$ pip install -r requirements.txt
Now you are all set to create models and run simulations with Vivarium Core!
Run Simulations
Some Terminology: Processes and Composites
We break our cell models into processes. Each process models part of the cell’s function. For example, you might have processes for metabolism, transcription, and translation. We can combine these processes into composites that model a system with all the functionality modeled by the included processes. For example, we could compose transcription and translation to create a fuller gene expression model.
We store individual processes in vivarium-template/template/processes
and the composers that generate composites of processes in
vivarium-template/template/composites. We recommend you use a similar
structure when creating your own processes and composers.
Running Experiments
Running experiments is as easy as executing their files. For example,
this repository comes with an example experiment in
vivarium-template/template/experiments/glucose_phosphorylation.py. Try
running it like this:
$ python template/experiments/glucose_phosphorylation.py
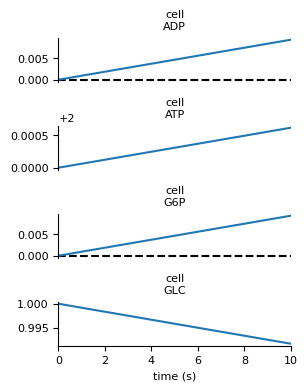
In out/experiments/glucose_phosphorylation you should see a file
simulation.png that looks like this:
Run Tests
We strongly encourage you to write tests for your code. It will make
development much easier for you. The template repository comes with some
tests already. To run them, just execute pytest.